Chapter 7: Catalog Management — Categories, Brands & Variations Engine

Taxonomy Hierarchy Architecture, Multi-Tier Category & Sub-Category Engineering, 1-Click Google Gemini AI SEO Synthesis, Brand Manufacturer Directory, and Comprehensive Product Variations (Sizes, Color Swatches & Promotional Tags).

Gemini AI SEO 95%+ Accurate Meta Copy
Split Workspace Table + Inline Ingestion
Visibility Assistant Live Storefront Telemetry
Full Variations Brands, Sizes, Colors & Tags

7.1 Catalog Taxonomy Architecture & Storefront Impact

A disorganized product catalog frustrates buyers and leads to abandoned carts. MartX establishes an enterprise-grade, multi-tier catalog architecture that cleanly organizes inventory from broad departments down to specific product SKUs, powering multi-level mega menus, breadcrumbs, faceted search filters, and targeted Google SERP permalinks.

The MartX 5-Tier Taxonomy Pipeline
Level 1: Primary Categories Root departments (e.g., Eyewear & Accessories, Men's Fashion, Jewelry). Powers top-level mega menus, category slider icons, and broad landing hubs.
Level 2: Sub-Categories Specialized sub-departments linked directly to parent categories (e.g., Ties & Cufflinks under Eyewear & Accessories). Drives faceted sidebar navigation filters.
Level 3: Brand Manufacturers Manufacturer identities (e.g., Apex Active, Solstice Optics, Zenith Time) with official logos, enabling brand-conscious shoppers to filter their favorite labels.
Level 4: Flexible Product Attributes (Sizes & Colors) Standardized variation matrices binding stock to specific purchasing options. MartX natively supports Dual-Attribute items (Apparel with both Size & Color) as well as Single-Attribute items (Footwear requiring only Size, or Handbags and Accessories requiring only Color swatches).
Level 5: Promotional Tags & Badges Cross-cutting marketing tags (e.g., #Trending, #Best Seller, #Sale) highlighting special collections across multiple unrelated product lines.

7.2 Categories Management Split Workspace & AI Synthesis

Managing root categories in MartX uses a high-productivity dual-column split workspace. Store managers can monitor live category inventory, inspect assigned product counts, search on the fly, and create new categories with AI-generated SEO copy without leaving the screen.

Admin Panel — Catalog Management: Categories Split Workspace
Categories Registry
Category Management Workspace (images/catalog/admin_category_management.png)
Left table features count filter (All Categories 7), live search, and product count badges; right side contains sticky Add Category form with Gemini AI button. MartX v1.0.0
Admin Access Route

Navigate to: Admin Dashboard → Catalog Management → Categories. The left column lists all categories, while the right column provides an instant inline creation form.

1-Click Google Gemini AI SEO & Description Generator

Drafting compelling category descriptions and SEO meta tags for dozens of categories can be tedious. MartX integrates Google Gemini 1.5 Flash directly into the category creation and edit forms:

  • Pro Tip Ingestion: Simply type the Category Name (e.g., "Eyewear & Accessories") into the form.
  • 1-Click AI Trigger: Click the Auto Generate with AI button with the sparkles icon.
  • Instant 4-Field Population: The AI automatically generates an engaging commercial Description, an optimized Meta Title (under 70 chars), targeted Meta Keywords, and a click-worthy Meta Description (under 160 chars).
How to Add a New Category (Step-by-Step)
Step 1: Open Workspace Navigate to Admin Dashboard → Catalog Management → Categories. The left column lists all categories, and the right column contains the sticky creation card.
Step 2: Enter Name & AI Type the Category Name (e.g. "Eyewear & Accessories"). Click Auto Generate with AI to automatically populate Description and SEO meta tags.
Step 3: Thumbnail & Slug Verify the auto-generated URL slug or customize it. Click the image upload box to select or upload an official category banner icon.
Step 4: Save & Publish Set Status to Active and click Save Category. The category immediately appears in the left table and in storefront navigation.

7.3 Category Editing & Visibility & Impact Assistant

When editing an established category, administrators must understand the downstream storefront impact. The MartX Category Editor features a two-column diagnostic layout: the left side handles category metadata, image replacement, and AI copywriting, while the right side provides the real-time Visibility & Impact Assistant.
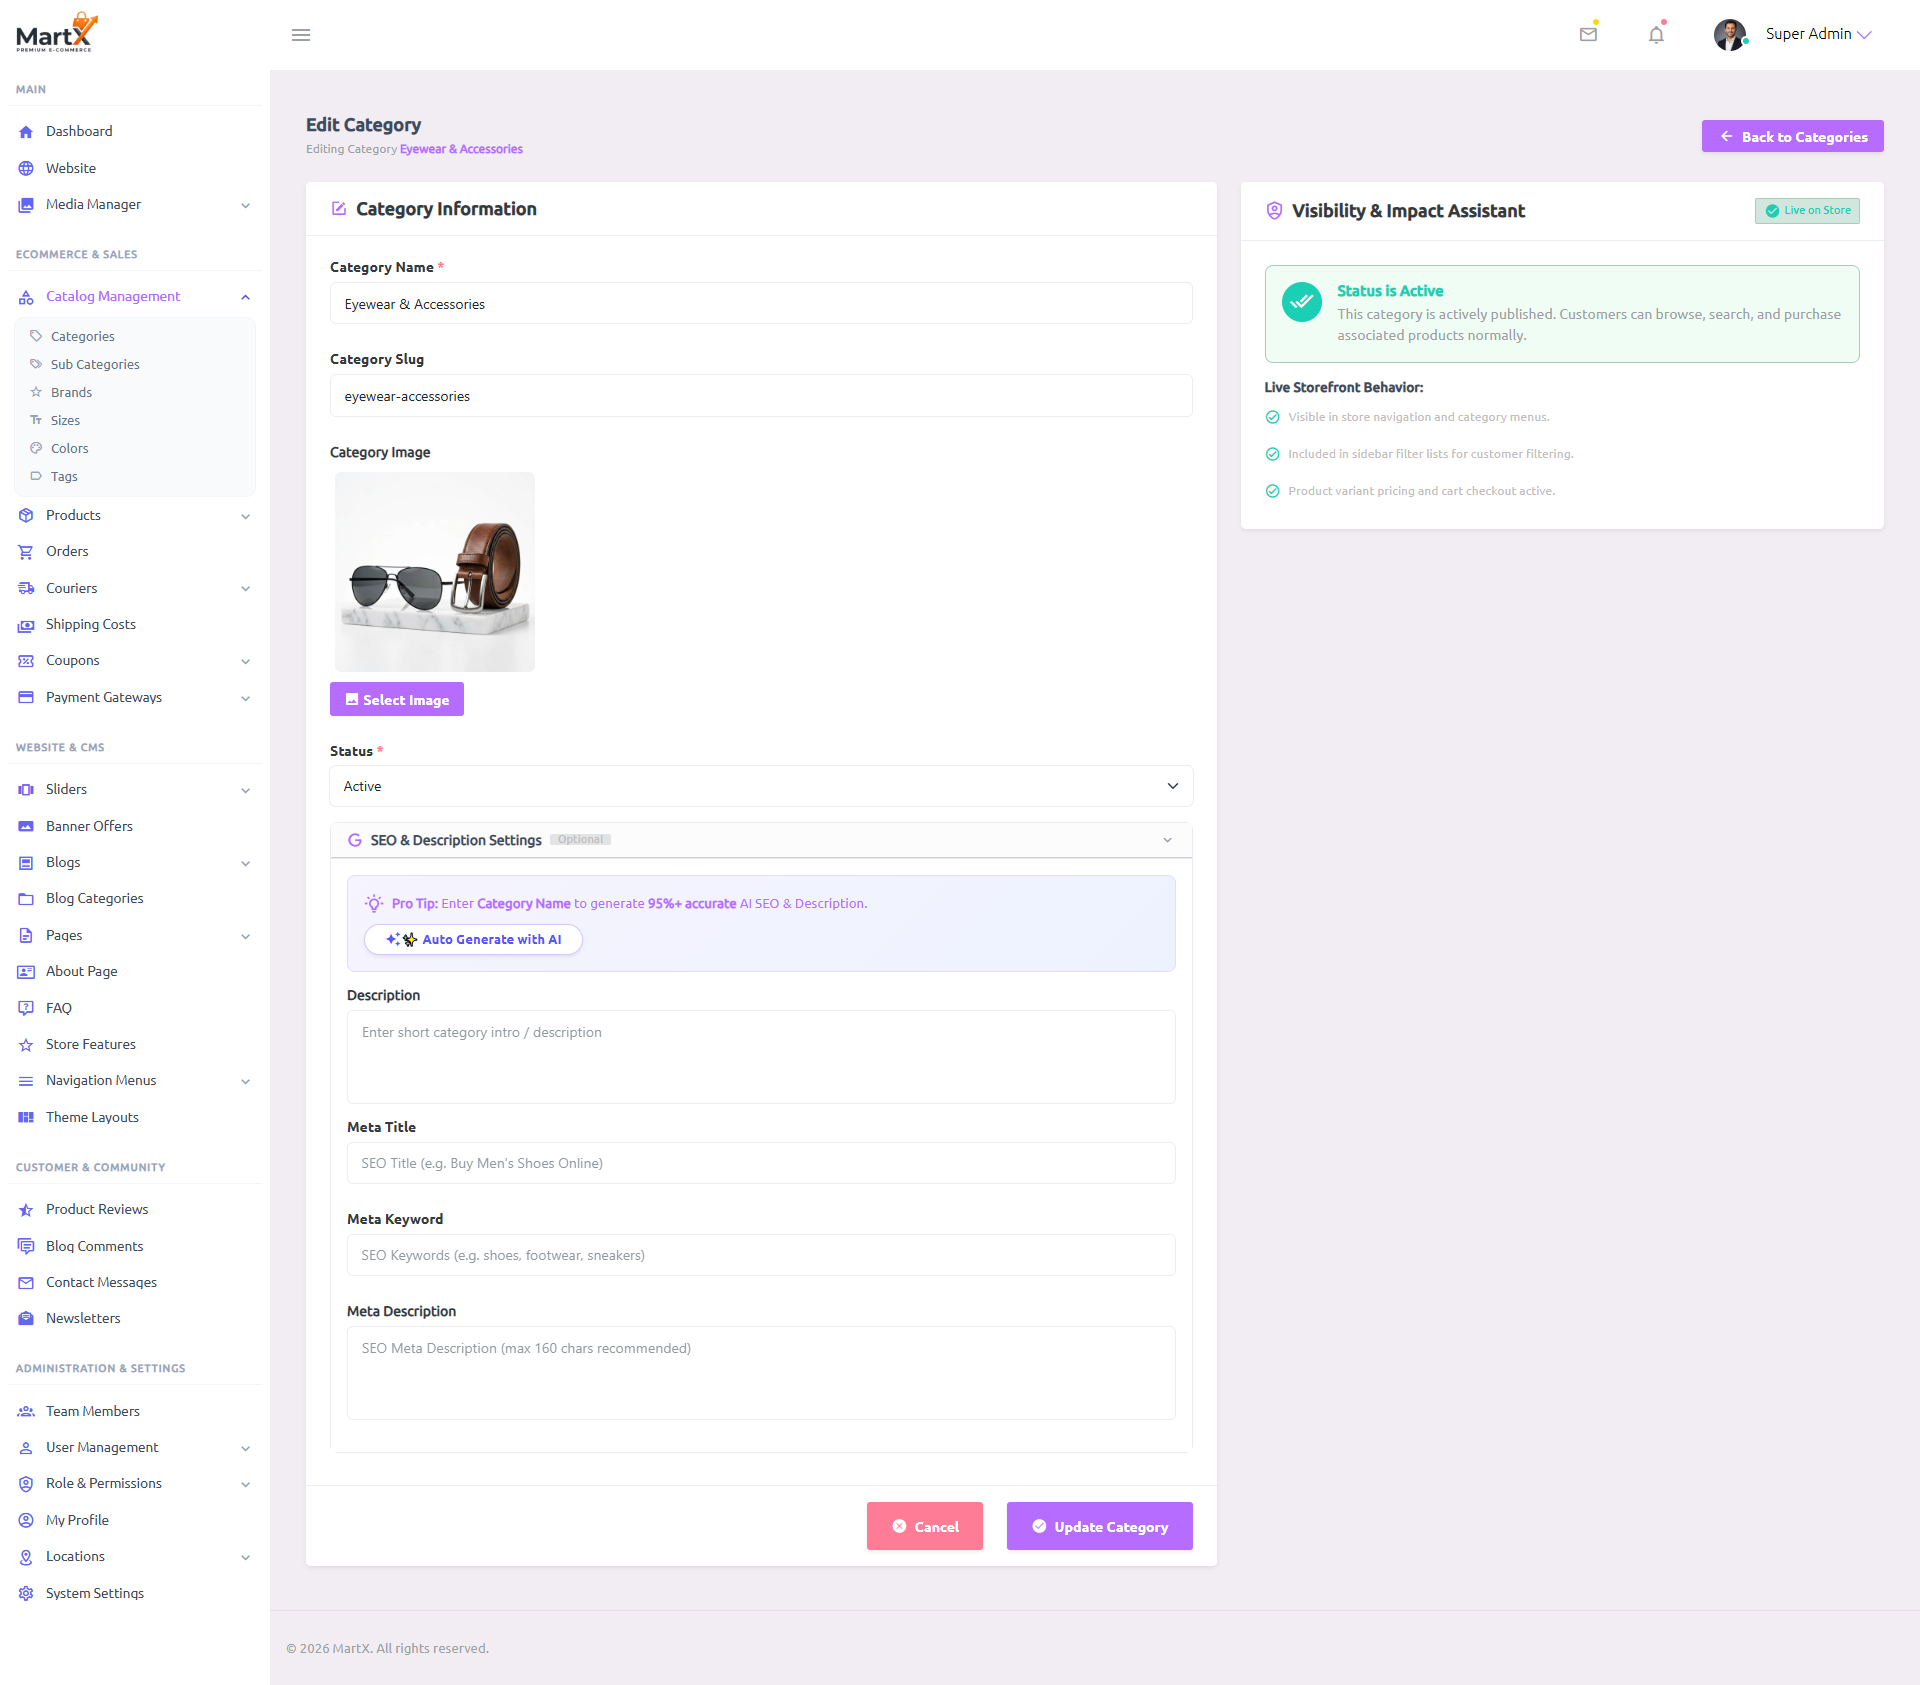
Admin Panel — Catalog Management: Edit Category Workspace & Visibility Assistant
Diagnostic Editor
Edit Category Workspace (images/catalog/admin_category_edit.png)
Right-hand panel displays the "Visibility & Impact Assistant" showing live storefront behavior checklist and active publication status. MartX v1.0.0
Visibility & Impact Assistant Telemetry Breakdown
Diagnostic Indicator Active Status State Storefront Functional Impact Inactive Safety Fallback
Store Navigation & Menus Visible Category appears in the main header mega menu, mobile offcanvas, and footer links. Hidden from all menus; URL returns safe 404 or redirect.
Sidebar Filter Lists Included Included in faceted catalog search filters, allowing buyers to narrow products by this category. Removed from faceted filter counts to prevent zero-result clicks.
Cart Checkout & Purchasing Active Associated products can be added to shopping bags and processed through checkout. Existing products remain in catalog but category landing page is suppressed.
How to Edit an Existing Category (Step-by-Step)
Step 1: Locate & Click Edit Find the category in the left table using the search bar or count filter. Click the blue Edit button to open the dedicated Category Editor.
Step 2: Modify Details & SEO Update the category title, replace the thumbnail image, or re-click Auto Generate with AI to refresh stale meta copy.
Step 3: Check Assistant & Save Review the Visibility & Impact Assistant checklist on the right side to confirm menu inclusion, then click Update Category.

7.4 Sub-Categories Split Workspace & Parent Mapping

Sub-categories enable granular classification within broad parent categories. In MartX, the Sub Category Management Hub organizes large inventories into manageable subsets (e.g. 32 sub-categories organized across pages 1 to 4), maintaining explicit parent-child relational integrity.

Admin Panel — Catalog Management: Sub Category Split Workspace
Sub-Category Registry
Sub Category Workspace (images/catalog/admin_subcategory_management.png)
32 sub-categories with pagination (1-4), parent category relationship tags, and inline creation card. MartX v1.0.0
Admin Access Route

Navigate to: Admin Dashboard → Catalog Management → Sub Categories. Use the search input or parent category dropdown to filter sub-categories instantly.

How to Add a Sub-Category (Step-by-Step)
Step 1: Open Sub-Categories Navigate to Admin Dashboard → Catalog Management → Sub Categories.
Step 2: Map Parent Category In the right-hand creation form, select the root Parent Category from the dropdown (e.g. Eyewear & Accessories).
Step 3: Name & AI SEO Enter the Sub-Category Name (e.g. "Ties"), trigger AI generation for descriptions, and attach an optional thumbnail icon.
Step 4: Save & Bind Click Save Sub Category. The sub-category is registered and immediately selectable in product creation forms.

7.5 Sub-Category Editing & Parent Reassignment

Merchandising strategies evolve as inventories expand. The Sub Category Editor allows store managers to reassign a sub-category to a different parent category, customize URL slugs (e.g. accessories-ties), re-generate AI SEO copy, and inspect the Visibility & Impact Assistant.

Admin Panel — Catalog Management: Edit Sub Category Workspace
Taxonomy Editor
Edit Sub Category Workspace (images/catalog/admin_subcategory_edit.png)
Allows reassigning Parent Category dropdown, uploading sub-category thumbnail via Media Modal, and generating AI SEO text. MartX v1.0.0
How to Edit & Reassign a Sub-Category (Step-by-Step)
Step 1: Open Sub-Category Editor In the sub-category table (browse pages 1 to 4 or search), click the Edit button next to the item.
Step 2: Reassign Parent or Slug To move this sub-department, choose a different Parent Category from the dropdown. Customize the URL slug (e.g. accessories-ties) for optimal SEO.
Step 3: Update & Sync Click Update Sub Category. All assigned products automatically inherit the new hierarchical path.

7.6 Brand Management & Manufacturer Hub

Brand recognition drives customer trust. The MartX Brand Management Hub allows store administrators to register official brand manufacturers (e.g. Apex Active, Velox Sport, Solstice Optics, Zenith Time, Aura Studio), bind crisp vector/PNG logos through Chapter 10's Central Media Modal, and track product associations across the storefront.

100% Royalty-Free & Trademark-Safe Pre-Seeded Brands: Commercial Safe

To protect script buyers and agency clients from corporate trademark infringement, the MartX demo installer bundles 10 fictional brand identities (Apex Active, Velox Sport, SprintX, Aura Studio, RawDenim Co., Nordic Basics, Stride Lab, Solstice Optics, Chronos & Co., Zenith Time) with custom AI-synthesized vector logos.

Store owners can use these royalty-free brands immediately for demo staging, client previews, or seamlessly replace them with their genuine supplier brands using the inline management form below. Full legal policy is available in Chapter 1.23 § 5 Licensing Policy.

Admin Panel — Catalog Management: Brands Split Workspace
Brand Directory
Brand Management Workspace (images/catalog/admin_brand_management.png)
Registered manufacturer directory showing brand logos, auto-slugs, assigned product count badges, and inline creation card. MartX v1.0.0
Admin Access Route

Navigate to: Admin Dashboard → Catalog Management → Brands. The left table displays registered labels, while the right side provides instant inline brand creation.

How to Add a Brand Manufacturer (Step-by-Step)
Step 1: Open Brands Hub Go to Admin Dashboard → Catalog Management → Brands.
Step 2: Enter Brand Name In the right-hand form, enter the Brand Name (e.g. "Apex Active" or "Zenith Time"). The URL slug auto-generates in real-time.
Step 3: Select Official Logo Click Select Logo to invoke Chapter 10's Central Media Picker modal. Choose your vector/PNG logo and click Insert Media.
Step 4: Save & Activate Ensure Status is toggled to Active and click Save Brand. The brand is registered and filterable on the storefront.
Brand Editor & Identity Customization Workspace

When updating manufacturer identities or refreshing corporate logos, the dedicated Brand Editor provides live logo preview, URL slug modification, and real-time storefront telemetry via the Visibility & Impact Assistant.

Admin Panel — Catalog Management: Edit Brand Workspace
Brand Inspector
Edit Brand Workspace (images/catalog/admin_brand_edit.png)
Edit brand form showing live brand logo thumbnail, slug customization, and the Visibility & Impact Assistant panel. MartX v1.0.0
How to Edit a Brand & Replace Logo (Step-by-Step)
Step 1: Open Brand Editor In the Brands table, find the manufacturer (use live search if needed) and click the blue Edit button.
Step 2: Replace Logo or Slug Click the logo thumbnail to swap the image via Media Modal, or fine-tune the commercial slug.
Step 3: Save Changes Inspect the right-hand Visibility Assistant status and click Update Brand.

7.7 Product Variations: Sizes & In-Place Edit Modal

Fashion, footwear, and apparel retail requires accurate dimensional variations. The Size Management Hub maintains standardized size rosters (e.g., XXL, XL, L, M, S) that can be selected when configuring variable products in Chapter 12.

Admin Panel — Catalog Management: Size Management Split Workspace
Size Directory
Size Management Workspace (images/catalog/admin_size_management.png)
Lists standardized sizing attributes with linked product counts (e.g. 48 products on L and M) and inline Add Size form. MartX v1.0.0
Admin Access Route

Navigate to: Admin Dashboard → Catalog Management → Sizes. Manage standard size matrices for fashion and footwear items.

How to Add a Size Variation (Step-by-Step)
Step 1: Open Sizes Roster Go to Admin Dashboard → Catalog Management → Sizes.
Step 2: Enter Size Name In the right-hand creation form, enter the Size Name (e.g. "XXL", "XL", "42", or "Free Size").
Step 3: Save & Bind Toggle Status to Active and click Save Size. The size becomes immediately selectable when creating products.
In-Place Edit Size Modal Workflow (Zero-Reload Editing)

To eliminate page navigation friction, MartX utilizes an instant in-place popup modal for attribute modifications. Administrators can update size labels or toggle active visibility in under two seconds without reloading the page.
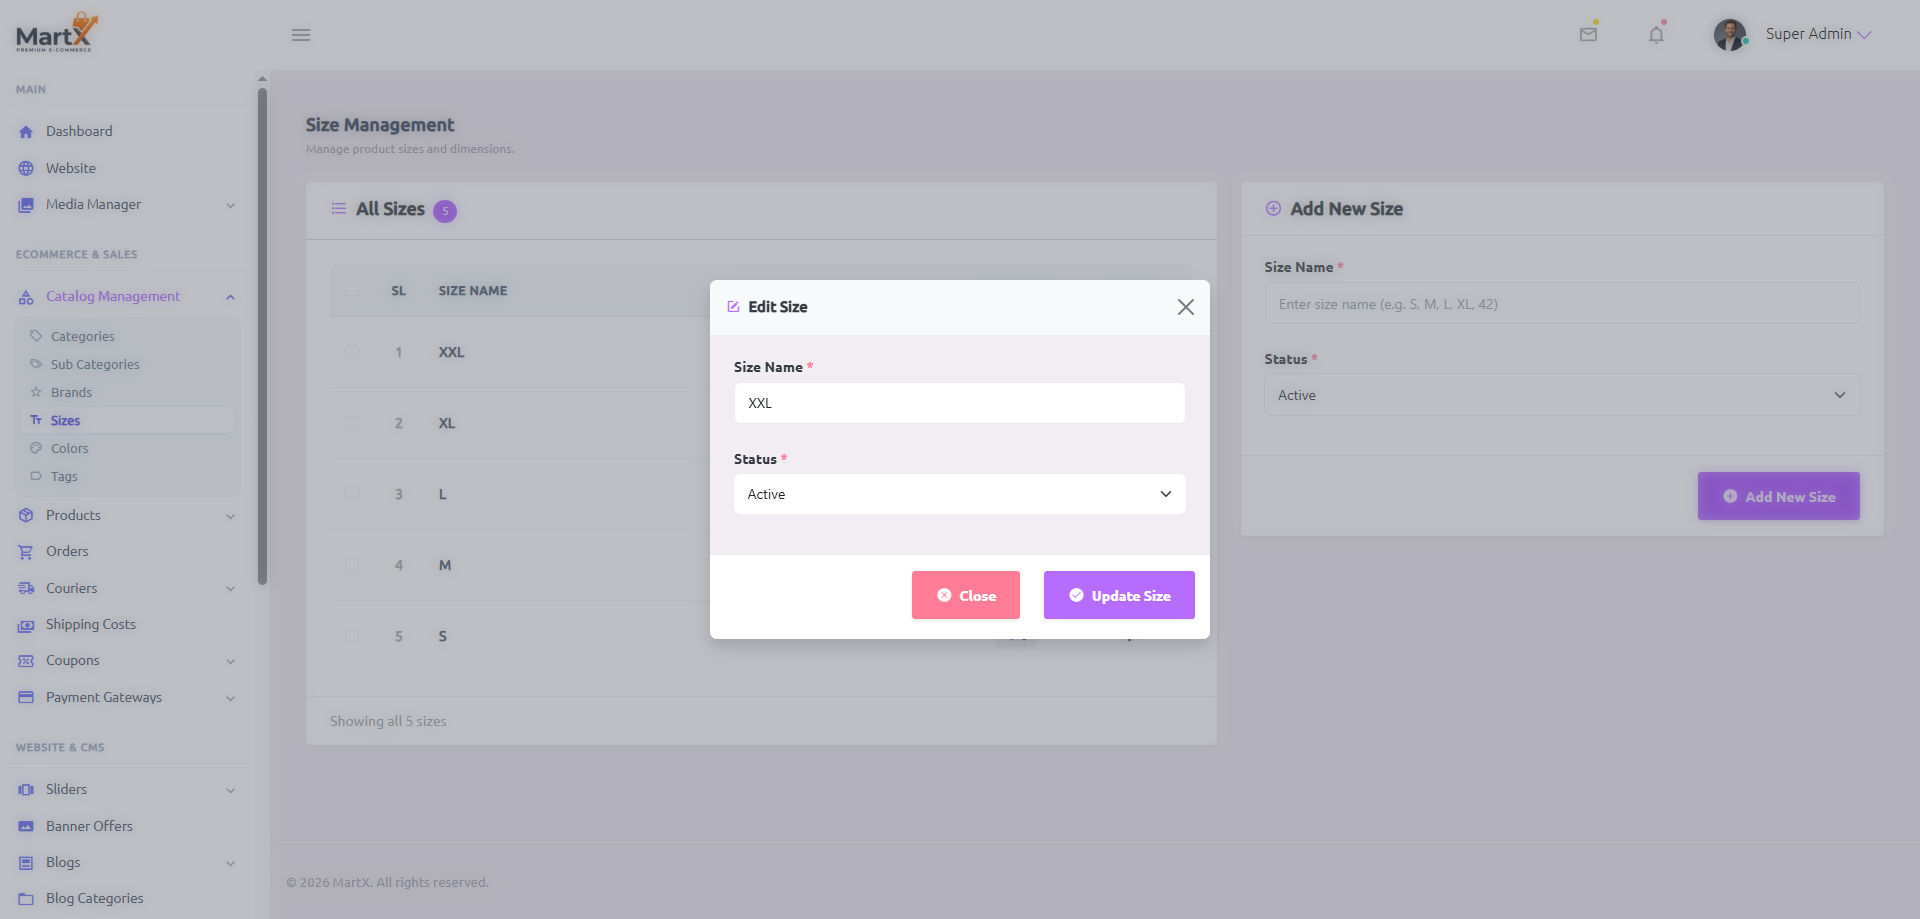
Admin Panel — Catalog Management: In-Place Edit Size Modal
Quick Modal
In-Place Edit Size Modal (images/catalog/admin_size_edit_modal.png)
High-speed popup modal: Modify size labels and active visibility in seconds without navigating away from the table. MartX v1.0.0
How to Edit a Size Attribute In-Place (Step-by-Step)
Step 1: Click Edit Pencil In the Size table, click the blue Edit (pencil) icon next to the size you wish to modify.
Step 2: Modify in Modal The fast popup modal opens immediately. Change the Size Name or toggle Status.
Step 3: Instant AJAX Update Click Update. The modal closes and the table updates in real-time with zero page reload.

7.8 Product Variations: Color Swatches & Hex Codes

Visual color accuracy prevents product returns. In MartX, the Color Management Hub equips administrators with a visual color swatch matrix. Each color record contains a human-readable title (e.g. Brown, Pink, Blue, Orange) paired with an exact 6-character HEX color code (e.g. #A52A2A, #0000FF) rendered as an interactive swatch circle on the storefront.

Admin Panel — Catalog Management: Color Management Split Workspace
Color Swatch Hub
Color Management Workspace (images/catalog/admin_color_management.png)
10 registered colors showing exact HEX codes and rendered circular swatch pills with linked product counts. MartX v1.0.0
Admin Access Route

Navigate to: Admin Dashboard → Catalog Management → Colors. Configure visual color swatches and true hex codes.

How to Add a Color Swatch (Step-by-Step)
Step 1: Open Colors Hub Navigate to Admin Dashboard → Catalog Management → Colors.
Step 2: Enter Name In the right form, enter the Color Name (e.g. "Navy Blue" or "Crimson").
Step 3: Pick HEX Code Use the visual color picker or type the exact 6-character HEX Code (e.g. #000080).
Step 4: Save Swatch Set Status to Active and click Save Color. A circular swatch dot appears in the registry.
Color Swatch Editor & Live HEX Calibration

When fine-tuning color tones or aligning swatches with new manufacturer stock, the dedicated Color Editor allows precise hexadecimal calibration with instant live visual swatch previews.

Admin Panel — Catalog Management: Edit Color Swatch Workspace
Color Inspector
Edit Color Workspace (images/catalog/admin_color_edit.png)
Edit color swatch showing Color Name, HEX code picker preview, and the Visibility & Impact Assistant panel. MartX v1.0.0
How to Edit a Color Swatch & Calibrate HEX (Step-by-Step)
Step 1: Open Color Editor In the Color table, find the target color and click the blue Edit button.
Step 2: Calibrate HEX Code Use the color input to adjust the hexadecimal shade, observing the live circular swatch pill.
Step 3: Update Swatch Verify storefront filter inclusion in the Visibility Assistant and click Update Color.

7.9 Promotional Tags & Product Badges

Cross-department marketing requires tags that span multiple categories. The Tag Management Hub allows store managers to define promotional badge tags (e.g. #Special, #Latest, #Hot, #Sale, #Trending, #Best Seller, #New) rendered as attention-grabbing badges on product cards and filterable in storefront searches.

Admin Panel — Catalog Management: Tag Management Split Workspace
Tag Directory
Tag Management Workspace (images/catalog/admin_tag_management.png)
Shows 7 promotional tags with live product count metrics (e.g. 26 products tagged #Trending) and inline Add Tag form. MartX v1.0.0
Admin Access Route

Navigate to: Admin Dashboard → Catalog Management → Tags. Configure marketing tags and promotional badges.

How to Create a Promotional Marketing Tag (Step-by-Step)
Step 1: Open Tags Hub Go to Admin Dashboard → Catalog Management → Tags.
Step 2: Enter Tag Name In the right creation card, type the Tag Name (e.g. "#Hot", "#Trending", or "#Sale").
Step 3: Save & Bind Set Status to Active and click Save Tag. The tag becomes instantly selectable when merchandising products.
In-Place Edit Tag Modal Workflow (Fast Badge Management)

Promotional marketing campaigns change rapidly. The In-Place Tag Modal allows store managers to re-title badges or deactivate seasonal tags across the entire store without leaving the table.

Admin Panel — Catalog Management: In-Place Edit Tag Modal
Quick Modal
In-Place Edit Tag Modal (images/catalog/admin_tag_edit_modal.png)
In-place popup modal allowing rapid editing of tag labels and active statuses with zero table reload. MartX v1.0.0
How to Edit a Promotional Tag In-Place (Step-by-Step)
Step 1: Click Edit Pencil In the Tag table, click the blue Edit (pencil) icon next to the tag you want to modify.
Step 2: Update in Modal The in-place modal pops up with the current tag preloaded. Modify the tag label or toggle Status.
Step 3: Instant AJAX Update Click Update. The modal dismisses and all product cards reflect the updated badge instantly!

7.10 Catalog Taxonomy & SEO Best Practices

To maximize search engine rankings, ensure intuitive navigation, and prevent data fragmentation across large inventories, adopt these architectural catalog standards:

Always AI-SEO Populate

Never leave Meta Titles or Descriptions empty. Always click Auto Generate with AI to target high-intent e-commerce commercial queries on Google SERP.

2-Tier Depth Limit

Keep taxonomy strictly to 2 tiers (Category → Sub-Category). Excessive nesting confuses mobile users and creates shallow, thin-content landing pages.

Standard HEX Swatches

Always use true standardized HEX codes for colors (e.g. #000000 for Black, #FFFFFF for White) so storefront swatch circles render accurately on retina displays.

Deletion Safeguards

Before deleting a category or brand, inspect its Products Count badge. Reassign products first to prevent orphan items without navigable department links.

Documentation
⚡ 3-Minute Quick Start 1. Introduction & Overview 2. Server Requirements 3. Installation Guide 4. License Activation 5. Dashboard Telemetry 6. Media Manager 7. Catalog Management 8. Products Management 9. Orders & Fulfillment 10. Couriers & Shipping Costs 11. Coupons & Marketing 12. Payment Gateways 13. Theme Layouts Hub 14. Navigation & Mega Menus 15. Sliders & Banners 16. Pages, FAQ & About 17. Blogs & Editorial 18. Reviews & Messages 19. Team Members & Staff Roles 20. Locations & Coverage 21. System Settings Hub 22. Web Cron & FAQs 23. Extra Security & Speed Boost